Menus
Menus Overview
Pages are not accessible from menus unless you explicitly add them. Your site’s page hierarchy should match your menu hierarchy.
[wpmudev-video video=”menus”]
Note: This video is from a third-party services and may not completely reflect the type of content and/or functionality of Tufts University’s JumboPress.
Types of Menus in JumboPress
There are three types of menus:
- The Top Menu or Main Menu is the menu at the top of the page, just under the header.
- The Footer Menu is the menus in the footer of your site. It has two parts; ‘Footer Menu 1’ on the left side and ‘Footer Menu 2’ on the right. You can use one or both menus.
- The ‘Information for’ menu is a menu on the very top of the page, in the dark grey ribbon. This is only available to schools, departments and institutes using JumboPress.
Menu Dashboard
To access the menus: Go to Appearance → ‘Menus’.
- At the top select which existing menu to work with by selecting that menu in the dropdown on the top left above the Pages list, then click ‘Select’.
- On the left side are the items you can add to the menu, most commonly a page or a custom link.
- On the right is the menu area. There might already be menu items there, or it will be empty if it is a new menu.
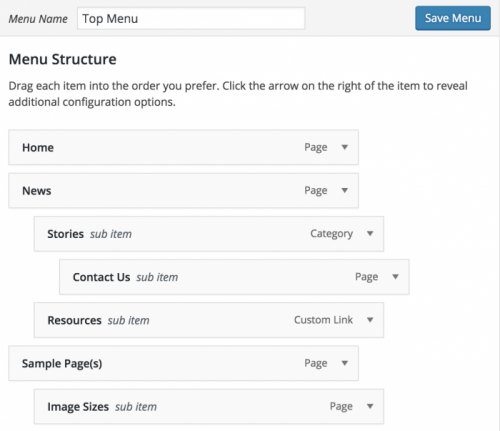
Menu Structure
Menu hierarchy is determined by the indent:
- Top-level menu items have no indent
- Sub-menu items are indented below their parent menus
Creating a new Menu
- Select Appearance → ‘Menus’ from left sidebar
- Click on ‘Create a new menu’
- Give the menu a descriptive name
- Click ‘Create Menu’
- In Menu Settings select the type of menu it is in Theme Locations. See above for a description of each type of menu.
- Select the page you wish to add to a menu from the Pages list, or create a custom link in the Custom Link section (see next section)
- Pages are listed in the reverse order of creation; the last page created is at the top of the list. You can also see a full list of existing pages or search for page
- Click ‘Add to Menu’
- Your selected page is at the bottom of the menu list
- Drag the gray box with the page name indented to the desired location in the menu list
- Click ‘Save Menu’
- To view the menu, click the home icon in the top toolbar
- The menu item for your page will be where you placed it
Editing an existing Menu
- Select Appearance → ‘Menus’ from left sidebar
- Select which type of menu you wish to work with
- Follow steps 4 through 10 of ‘Creating a new Menu’ above
Linking a Menu Item to an External Site
You can also link a menu item to an external site.
- On the Menus page, enter the URL of the site in the ‘Custom Links’ section (located on the left side below the ‘Pages’ list)
- Click ‘Add to Menu’
- Follow steps 6 through 10 of ‘Creating a new Menu’ above
Menu hierarchy & Breadcrumbs
The menu hierarchy determines the bread crumbs list on the top of the page, just under the navigation. So if you have and About Us, with a Team page under it in the menu hierarchy the bread crumb looks as follows:
Home / About Us / Team
Menu hierarchy vs. Page hierarchy
There is no automatic relationship between menu items and pages.
- Menu hierarchy is determined by how pages or custom links are ordered and indented in the menu list. Pages all the way to the left will appear on the menu ribbon, indented once will drop down and indented twice it will fly out. Any more will not appear on the menu.
- Page hierarchy is determined by selecting the Parent page from the Add Page/Edit Page screen.